Jeremy Howard
Note: please view this using the video player at http://course.fast.ai, instead of viewing on YouTube directly, to ensure you have the latest information. If you have questions, see if your question already has an answer by searching http://forums.fast.ai, and then post there if required.
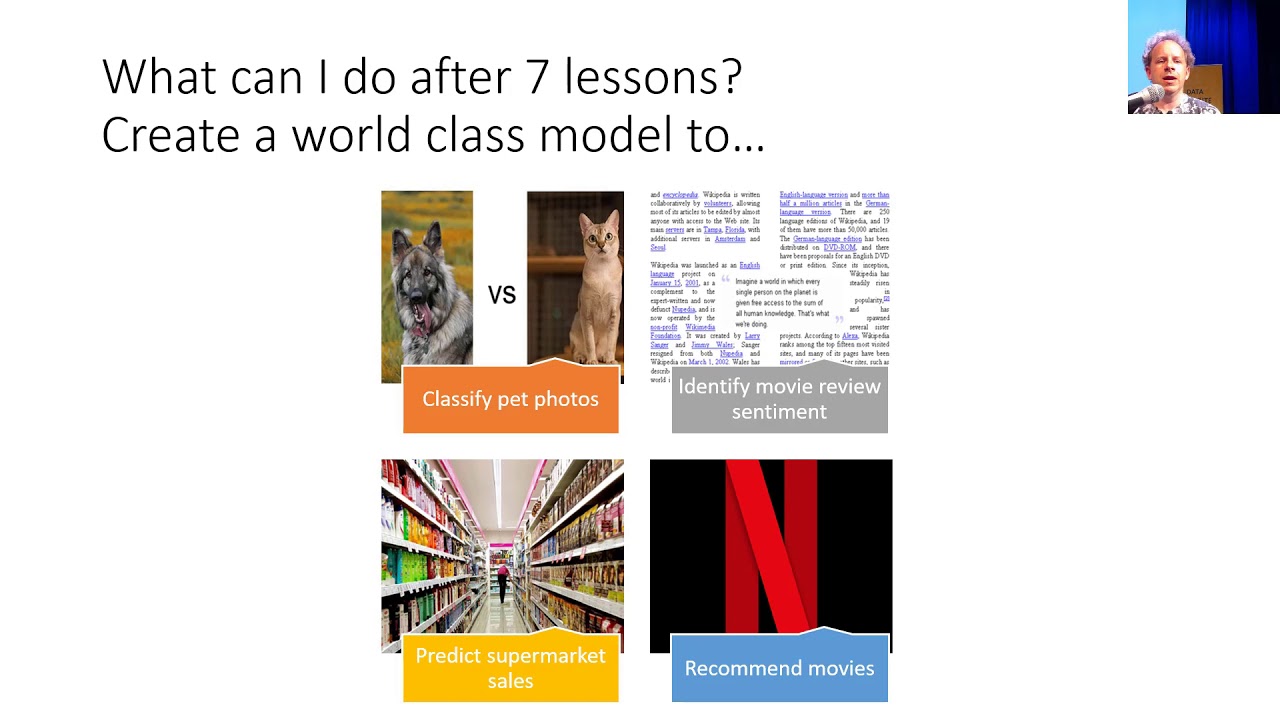
The key outcome of lesson 1 is that we’ll have trained an image classifier which can recognize pet breeds at state of the art accuracy. The key to this success is the use of *transfer learning*, which will be a key platform for much of this course. We’ll also see how to analyze the model to understand its failure modes. In this case, we’ll see that the places where the model is making mistakes is in the same areas that even breeding experts can make mistakes.
We’ll discuss the overall approach of the course, which is somewhat unusual in being *top-down* rather than *bottom-up*. So rather than starting with theory, and only getting to practical applications later, instead we start with practical applications, and then gradually dig deeper and deeper in to them, learning the theory as needed. This approach takes more work for teachers to develop, but it’s been shown to help students a lot, for example in education research at Harvard (https://www.gse.harvard.edu/news/uk/09/01/education-bat-seven-principles-educators) by David Perkins.
We also discuss how to set the most important *hyper-parameter* when training neural networks: the *learning rate*, using Leslie Smith’s fantastic *learning rate finder* method. Finally, we’ll look at the important but rarely discussed topic of *labeling*, and learn about some of the features that fastai provides for allowing you to easily add labels to your images.
Note that to follow along with the lessons, you’ll need to connect to a cloud GPU provider which has the fastai library installed (recommended; it should take only 5 minutes or so, and cost under $0.50/hour), or set up a computer with a suitable GPU yourself (which can take days to get working if you’re not familiar with the process, so we don’t recommend it). You’ll also need to be familiar with the basics of the *Jupyter Notebook* environment we use for running deep learning experiments. Up to date tutorials and recommendations for these are available from the course website (http://course.fast.ai).
Source

Really good explanation. Better than V2. Sad that the audio quality at the end went bad.
The best course for learning Deep Learning free and fast thanks for this course Jeremy
Notes for the lecture :
https://forums.fast.ai/t/deep-learning-lesson-1-notes/27748
Very useful video. One question. If we are building a world class image classifier should not we use a capsule network instead of a CNN??
I have not watched the 2018 one. Just wondering if anyone has seen both can give some insight on how much this one is different than the other one
1:02:49 About Splunk, if a fraud detection problem is recast as an image recognition, could this suffer from adversarial attack? I.e. do whatever bad deeds bad guys do, then just do one little thing, that result in a few pixel or noise added, such that the network is fooled. Would be interested for security and adversarial researchers to find out.
I found this video after spending a week reading through tensorflow. . I am someone who just wants to use machine learning as a tool like a hammer for some projects and fastai seems exactly that. I can't wait to see what this becomes
Why would they reveal the working of their fraud detection system
This level of education is a rare pearl. Thank you for the effort you put into it!
Link to lesson 0?
"all our doc is also code" — f'ing awesome!
Thanks so much Jeremy for these videos!!
Is there a version with better audio? The compression creates many high pitch artifacts, and is pretty hard/uncomfortable to listen to in general.
If someone encounters error like Name ConvLearner() not defined, then use cnn_leaner(). Earlier u could have also used create_cnn().
Imma finish this time
What do I need to know to build a deep learning framework? please tell me the courses and books. please answer
I came here to complain about the sound, figuring I would be the only one as it was a small detail. Forgot this video's target market are developers 😀
Why is the audio so poor? next time try to ket a better microphone, this really depreciates the learning experience.
For all those getting ConvLearner not defined error:
ConvLearner has been replaced by cnn_learner.
When I run learn. fit_one_cycle(4) , my kernel dies. Can somebody help me?
Um…, er…, okay…
I am currently working on the construction and study of neural networks. So I was thinking if an algorithm like this could be able to generate music. For this reason I have created 3 different Ai models (a Feed Forward LSTM, an autoencoder and an autoencoder with attention) with different parameters (cell size) and with different training datasets (one form classical piano, one from guitar and one with both instruments) and I have created a game(on this link: http://geofila.pythonanywhere.com/vote ) where you have to listen to pieces and try to figure out which one is made from a computer and which one from a human. All of the code is free on github. Separation in my opinion is not so simple. I look forward to see your results.
I am wondering why the Convlayer doesn't even ask for the number of hidden layers. If it's taking some default values, what are those?
Huawei managed 2:43 to 93% accuracy, what does this mean?
Should I be fluent with pytorch before using high level libraries like fastai?
Isn't there a way to automatically set the batch size to the maximum that the GPU can handle?
great explanation of deep learning !!!!
your course is also valuable course like sentdex !!
This is amazing. Thanks for sharing your knowledge
Hi, thanks for this wonderfull and helpfuull post. But, please I am running the following line of code :
path= untar_data(URLs.PETS);path
And here is what is I am getting:
EmptyHeaderError Traceback (most recent call last)
~Anaconda3libtarfile.py in next(self)
……..
…………
……………..
ReadError: empty file.
I could not find any solution online. Anyone to help? thanks in advance
"all our doc is also code" — f'ing awesome!
When I run learn. fit_one_cycle(4) , my kernel dies. Can somebody help me?
Really good explanation. Better than V2. Sad that the audio quality at the end went bad.
guys can anyone share me the pet dataset
Thank you very much Jeremy
Finally!!!. Thanks Jeremy
This is amazing. Thanks for sharing your knowledge
im so confused, does he have his gpu running during the whole tutorial? Does he spin up jupyter while he is ssh'd into his gpu?
best course ever
I just finished a Master's in Software Eng… I much prefer the way things are taught in this course and I am finally learning what I wanted to during my education! Following this course during the confinement!
Can I go for Google Colab, for the implementation?
Hey guys! In the video Jeremy says his results took only 4 minutes to compute, whilst for one cycle I'm getting 15 minutes.
I assume I'm not using my GPU here but I don't know how to do this. I'm using the fastai library although I have pytorch installed too. Using Google Colab for this.
Any help is much appreciated!
Are you uploading new course for 2020 coz I am sure lot has changed
How to find F1 score recall and precision in it
Convlearner is not defined
After applying cnn_learner it's showing model is not defined
hi i suffer with below problem, my Accuracy Precision and recall and F_beta is same so i what i do…
from fastai.metrics import accuracy,Precision,Recall,FBeta
learn = cnn_learner(data, models.vgg16_bn, metrics=accuracy)
learn
learn.metrics=[accuracy,
Precision(average='macro'),
Recall(average='macro'),
FBeta(average='macro')]
epoch train_loss valid_loss accuracy precision recall f_beta time
0 1.193228 0.408133 0.840741 0.850517 0.840709 0.840866 02:35
1 0.816444 0.280234 0.875926 0.876151 0.876655 0.876534 00:35
2 0.685609 0.227305 0.894444 0.898285 0.895033 0.894569 00:34
3 0.570045 0.212675 0.896296 0.899135 0.896895 0.896825 00:34
that was a lesson on image classification? really? maybe you should change the title to course intro, success stories from google, stanford etc., intro to fast bla bla and tiny little baby steps in image classification…
Hi Sir, what are the pre-requisite to take this course? thanks
on path.ls()
i am getting[WindowsPath('C:/Users/rajve/.fastai/data/oxford-iiit-pet/images')]
instead of [images ,annotations]
those files have been downloaded in my folder pc but i am not able use them
so
what to do?
how to get Jupyter Notebook and notes link?
please help
At 1:10:24 did any one get Attribute error ("Tensor object has no attribute ndim) when you run the interp.plot_top_lossess
Hi,I have the following question: It's always required unfreeze and go through the fine-tuning step?
I really appreciate the top-down approach as it enables you to see results faster which keeps you motivated. Just the perfect fit for people who are on the practitioner side of things. Keep it up!
Another simple way to try transfer learning for image classification on your task even without writing any code is an Android app called Pocket AutoML. It trains a model right on your phone so it can even work offline.